Builder Tips Home Page | Download Q300Ver en español

Construct a Solid, Squeak-Free Floor System
If not installed properly, floor systems can squeak, buckle, and cause nail-pop. To cut callbacks due to these problems, follow the simple floor construction steps below. APA recommends a glued floor system.
Dry lumber is more dimensionally stable than green lumber. As it dries, green dimension lumber tends to cause nail-pop, making bumps under the finish flooring. These bumps can lead to squeaks and to accelerated wear of the finish flooring. Engineered wood, on the other hand, is dried during production and should not cause nail-pop when properly installed.
APA structural panels are manufactured in a variety of grades and thicknesses. When selecting your floor panel, consider the applied load, joist spacing, finish flooring and floor system (e.g., single floor or subflooring plus underlayment). See Table 1 to select the panel that is best for your job.
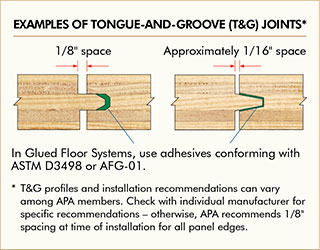
From their initial mill-dry state, panels will expand as they reach their equilibrium moisture content. If they are installed without room to expand, panels may buckle. APA recommends leaving 1/8-inch space at all sheathing and Sturd-I-Floor edge and end joints, including tongue-and-groove joints, unless recommended otherwise by the product manufacturer.
To further minimize the potential for panel buckling, allow panels to acclimatize prior to installation. To do this, stand panels on edge for several days, allowing air circulation to all sides.
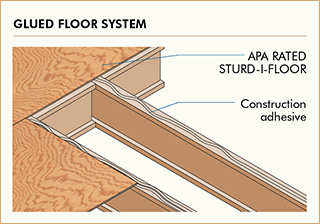
To prevent premature dryout of the adhesive, spread enough glue to lay ONLY one or two panels at a time. To assure the panels will be firmly and permanently secured to the joists, wipe away water, dust and debris before applying glue.
Apply glue (about 1/4-inch-diameter bead) to framing members in a continuous line, or in a serpentine pattern in wide areas. Glue all tongue-and-groove joints by spreading glue in groove. Avoid squeeze-out by applying a thinner line in groove (about 1/8 inch) than on joists.
Complete all nailing of each panel before the glue sets or skins over. Check glue manufacturer's recommendations for allowable time. Remember, warm weather accelerates glue setting.
The correct nail size and spacing for your job depends on your joist spacing and panel thickness, as well as the type of panel product you are using. Attachment schedules and fastener recommendations are provided in Table 1: Panel and Attachment Recommendations.
For other structural wood panel application recommendations and typical panel trademarks, see APA's Engineered Wood Construction Guide, Form E30.